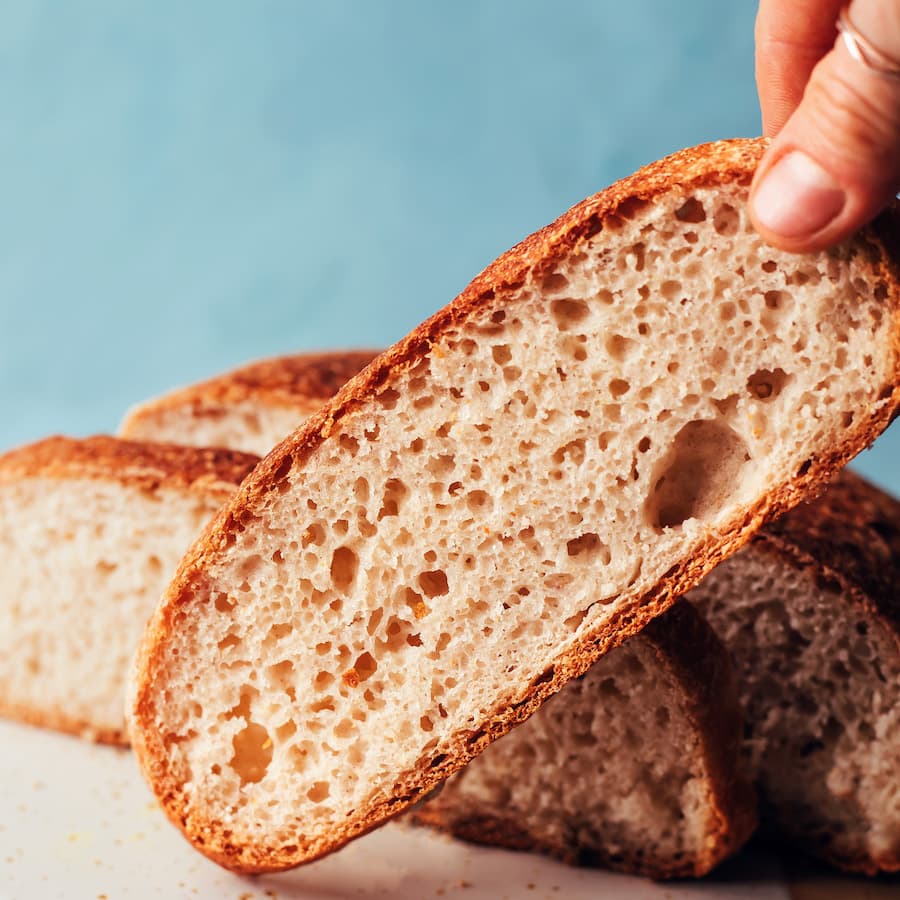
Crusty Gluten-Free Artisan Bread
A FLUFFY, crusty, artisan-style gluten-free bread recipe that’s vegan and EASY to make. Just 7 ingredients required for this beautiful loaf!
Ingredients
- 1 ⅓ cup warm water
- 2 Tbsp cane sugar ((or sub maple syrup))
- 2 ¼ tsp active dry yeast ((1 packet yields 2 ¼ tsp or 7 g))
- 1 ½ Tbsp psyllium husk powder*
- 1 cup brown rice flour
- 3/4 cup potato starch ((NOT potato flour))
- 1/2 cup tapioca flour ((also called tapioca starch))
- 1 tsp sea salt
Instructions
- 1
--- INSTRUCTIONS FOR A DUTCH OVEN OR LOAF PAN ---
- 2
Dust a proofing basket with brown rice flour -OR- lightly coat a small mixing bowl with water (so the flour sticks) and then dust with flour. Set aside. If using a loaf pan, just oil the loaf pan and dust it with brown rice flour. See notes for additional instructions for using a loaf pan.
- 3
In a small mixing bowl or liquid measuring cup, whisk together the warm water (100-110 degrees F / 38-43 C) and sugar until the sugar is dissolved. Whisk in the yeast and let it bloom on the counter for about 10-15 minutes until frothy. If it doesn’t foam, start over — your water may have been too hot or the yeast was expired.
- 4
Once the yeast has bloomed, whisk in the psyllium husk powder and let the mixture gel for about 10 minutes.
- 5
Meanwhile, to a medium mixing bowl, add brown rice flour, potato starch, tapioca flour, and salt. Whisk well to combine. Once the yeast mixture has rested, add it to the dry ingredients. Use a wooden spoon or spatula to mix thoroughly. The dough should look shaggy to start. Once it becomes difficult to stir, use your hands to vigorously knead into a cohesive yet still very sticky ball. It should take at least 3 minutes* to fully break the flour down into the liquid. Feel free to squeeze the dough between your fingers to fully incorporate it (our preferred method). Your hands will get sticky and be covered with dough — this is normal and encouraged!
- 6
Scrape the excess dough from your hands and place it back into the bowl. Wash and dry your hands well. The dough should be tacky but combined enough that you are able to handle it. If it’s still too sticky, spend additional time kneading the dough together.
- 7
Turn the dough out onto your work surface. You shouldn’t need flour to shape it, but if you do, use very little! Use your hands to shape the dough into a ball and place it into your prepared proofing basket, flour-dusted bowl, or flour-dusted loaf pan. If you find your hands are sticking to the dough, feel free to moisten them slightly with water. If using a loaf pan, spread the dough so it's close to the corners of the pan – it will spread further as it rises. Cover your dough ball with a towel and let rise in a warm place for 30 minutes until it has almost doubled in size.
- 8
After the 30 minutes is up, place a Dutch oven (with the lid on) into the oven and preheat it to 450 degrees F (232 C). If using a loaf pan, reference the timing in the notes section instead of the next two instructions.
- 9
Once the oven is preheated and your Dutch oven is hot, place a piece of parchment paper onto your work surface and gently flip the dough out onto it, using your hand at the bottom of the dough to guide it. Use oven mitts to carefully remove your Dutch oven from the oven, place it onto a heatproof surface, and take the lid off of it. Lift the edges of the parchment paper to place your dough (and the parchment paper) into the Dutch oven. Place 3-4 ice cubes on the outside of the parchment paper so they are not touching the dough. Put your oven mitts back on and place the lid back onto the Dutch oven. Place the Dutch oven back into the oven on the center rack and bake for 35 minutes.
- 10
Once the 35 minutes have passed, lower the oven temperature to 425 degrees F (218 C) and put your oven mitts back on to carefully remove the lid from the Dutch oven and place it onto a heatproof surface. Close your oven and bake for another 30-35 minutes without the lid. The crust should be dark and the bread should sound hollow when you tap it with a spoon or knife.
- 11
Once baked, use oven mitts to remove the Dutch oven from the oven. Use the parchment to carefully lift the bread from the pan and place on a cooling rack to fully cool (~2-3 hours). You want the bread to be fully cooled before cutting to avoid a gummy texture. Store the bread in a bread wrap or bag at room temperature for up to 2-3 days, though best within the first 24 hours. You can also store the bread in the refrigerator for up to 5 days or freeze sliced bread for 1 month (or longer). After refrigerating/freezing, toast the bread before enjoying!
- 12
--- INSTRUCTIONS FOR A BAKING SHEET ---
- 13
Dust a proofing basket with brown rice flour -OR- lightly coat a small mixing bowl with water (so the flour sticks) and then dust with flour. Set aside.
- 14
In a small mixing bowl or liquid measuring cup, whisk together the warm water (100-110 degrees F / 38-43 C) and sugar until the sugar is dissolved. Whisk in the yeast and let it bloom on the counter for about 10-15 minutes until frothy. If it doesn’t foam, start over — your water may have been too hot or the yeast was expired.
- 15
Once the yeast has bloomed, whisk in the psyllium husk powder and let the mixture gel for about 10 minutes.
- 16
Meanwhile, to a medium mixing bowl, add brown rice flour, potato starch, tapioca flour, and salt. Whisk well to combine. Once the yeast mixture has rested, add it to the dry ingredients. Use a wooden spoon or spatula to mix thoroughly. The dough should look shaggy to start. Once it becomes difficult to stir, use your hands to vigorously knead into a cohesive yet still very sticky ball. It should take at least 3 minutes* to fully break the flour down into the liquid. Feel free to squeeze the dough between your fingers to fully incorporate it (our preferred method). Your hands will get sticky and be covered with dough — this is normal and encouraged!
- 17
Scrape the excess dough from your hands and place it back into the bowl. Wash and dry your hands well. The dough should be tacky but combined enough that you are able to handle it. If it’s still too sticky, spend additional time kneading the dough together.
- 18
Turn the dough out onto your work surface. You shouldn’t need flour to shape it, but if you do, use very little! Use your hands to shape the dough into a ball and place it into your prepared proofing basket or flour-dusted bowl. If you find your hands are sticking to the dough, feel free to moisten them slightly with water. Cover your dough ball with a towel and let rise in a warm place for 30 minutes until it has almost doubled in size.
- 19
After the 30 minutes is up, boil 1 cup (240 ml) of water. Preheat your oven to 450 degrees F (232 C), place an oven rack in the middle of your oven and a rack below that one, find two baking sheets, and set aside.
- 20
Once the oven is preheated, place one of the baking sheets on the lower oven rack and carefully fill with the boiling water. Gently flip the dough out onto the other baking sheet, using your hand at the bottom of the dough to guide it. Place the baking sheet with the dough into the oven on the higher baking rack and bake at 450 degrees F (232 C) for 30 minutes. Lower the temp to 425 degrees F (218 C) and bake for another 25-30 minutes. The crust should be dark and the bread should sound hollow when you tap it with a spoon or knife.
- 21
Once baked, use oven mitts to remove the pan from the oven then carefully lift the bread from the pan and place on a cooling rack to fully cool (~2-3 hours). You want the bread to be fully cooled before cutting to avoid a gummy texture. Store the bread in a bread wrap or bag at room temperature for up to 2-3 days, though best within the first 24 hours. You can also store the bread in the refrigerator for up to 5 days or freeze sliced bread for 1 month (or longer). After refrigerating/freezing, toast the bread before enjoying!
Nutrition Facts
undefined
Calories
Protein
Carbs
Fat